Warpia SWP240 Bedienungsanleitung
Stöbern Sie online oder laden Sie Bedienungsanleitung nach Kommunikationszubehör Warpia SWP240 herunter. Warpia SWP240 User Manual Benutzerhandbuch
- Seite / 28
- Inhaltsverzeichnis
- LESEZEICHEN
- Dock n’ Charge 1
- Contents 2
- Locating the Controls 4
- Using the Dock n’ Charge 8
- Using the video outputs 9
- Show Hidden Icons’ 10
- TV" 13
- Extend Mode 14
- Mirror mode 15
- Single-display mode 15
- Fit to TV 16
- Inferred Modes 19
- Checking for updates 20
- Error Messages 27
- Warpia Support 28
- Contacting Warpia 28
Inhaltsverzeichnis
1 Dock n’ Charge Product Guide P/N: SWP240A
10 6. Configuring External Displays This Section describes how to use DisplayLink Software which is included with the Dock n’ Charge and is used to
After clicking on the DisplayLink icon, a menu appears with several options. They are shown and described below. Select an option from the me
Display Description Screen Resolution Displays a list of available resolutions. Some resolutions may be enclosed by [ ]. Please see, Inferred M
13 Display 1\11enu Description Off Switches off this display. Optimize for Video (Windows Vista Only) Select this option for better movie p
14 6.1 Understanding the Video Output Modes The Dock n’ Charge works in the following three video output modes: • “Extend mode” • “Mirror mode” • “
15 Mirror mode When the Dock n’ Charge is in mirror mode, it clones your Laptop/Tablet screen to the external monitor(s). The docking station autom
16 Fit to TV What is Fit to TV? • If using your Dock n’ Charge to connect to a TV, all of the Windows desktop may not be available to view. Man
17 • You will also see a red border on the External display • The red border shows the size of the new Windows desktop. Use the “+” and “-”
18 Supported resolutions and refresh rates The following table lists the refresh rates supported at various resolutions for the Dock n’ Charge’s
19 Inferred Modes Some modes in the DisplayLink GUI are shown with [ ] around them. • This occurs when connecting a monitor with a preferred
2 Contents 1. Packaging Contents 3 2. System Requirements 3 3. Locating the controls 4 4. Installing the Warpia Dock n’ Charge 5 4.1 Installing t
20 6.2 Working with the Docking Station Utility Checking for updates The DisplayLink utility is able to check whether there is any update for the
21 Optimizing the video playback quality In the Windows Vista, Windows 7, Windows 8, or Windows 8.1 operating system, the Dock n’ Charge enab
22 For the Windows 7 operating system: 1. Click the DisplayLink icon in the Windows notification area. A pop-up menu opens. 2. Select Video Setup. A
23 7. Helpful Tips & Troubleshooting General 1. The DisplayLink icon is not displayed on your screen. The DisplayLink icon is displayed only
24 • The connection between the USB 3.0 cable and your Laptop or Tablet • The connection between the USB 3.0 and the Dock n’ Charge • The connecti
25 4. The images on the external monitor(s) flutter. To solve the problem, check the following: a) Ensure that the external monitor(s) are well conn
26 Audio You cannot hear anything through your notebook computer speakers or you cannot use the audio connectors on the notebook computer. By de
27 Error Messages The DisplayLink software occasionally displays user messages in a bubble in the notification area. The table below lists the us
28 8. Warpia Support & Contacting Warpia Warpia Support If you require additional help or are still having problems operating the Dock n’ Ch
3 1. Package Contents Dock n’ Charge USB 3.0 cable Installation CD Quick Start Guide DVI to VGA Adapter Power Adapter 2
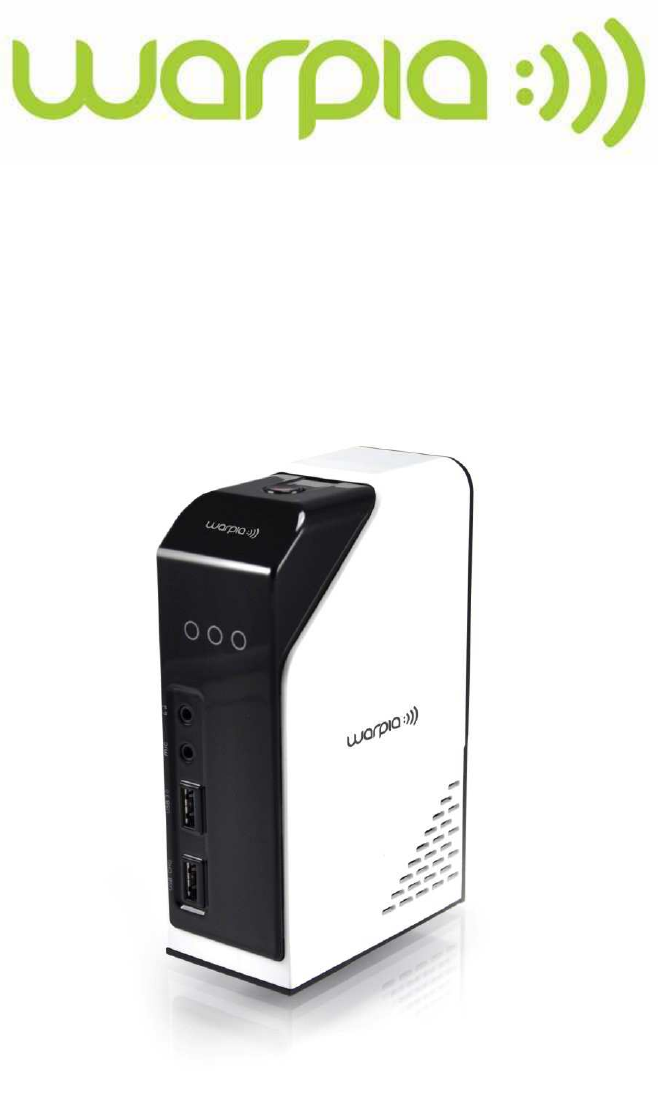
4 3. Locating the Controls ① ⑤b ⑤ ② ⑥ ③ ⑧ ④ ⑦ ⑨ ④b ⑩ ① Power button Used to turn on or turn off the docking station. ② Power indicator light
5 4. Installing the Warpia Dock n’ Charge 4.1 Installing the Software Driver Insert the CD into the computer and laptop CD-ROM • The disc shoul
4.2 Uninstalling the Device Driver For the Windows XP, Windows Vista, or Windows 7 operating system: 1. Exit all applications that use the Dock n
7 4.3 Connecting the Dock n’ Charge to Your Computer To connect the docking station to your Laptop or Tablet, do the following: 1. Connect the dc
8 5. Using the Dock n’ Charge This section provides information on how to use the headset and microphone jacks, Gigabit Ethernet connector, USB conne
9 Using the video outputs The video outputs on the Dock n’ Charge consist of one HDMI connector and one DVI-I connector. A VGA monitor can be plug
Verwandte Produkte und Handbücher für Kommunikationszubehör Warpia SWP240
 (7 Seiten)
© 2020, manymanuals.de. Alle Rechte vorbehalten. | 0.818 s |
 Manymanuals.com
 Manymanuals.de
 Manymanuals.fr
 Manymanuals.it
 Manymanuals.pl
 Manymanuals.cz
 Manymanuals.es
 Manymanuals-pt.com
Kommentare zu diesen Handbüchern